|
Elektra 0.11.0
|
|
Elektra 0.11.0
|
In this tutorial, we will go through the steps necessary to contribute to Elektra to make it easier for you to get started. We will use a Unix based OS like Linux and CLion for development, but depending on where you want to contribute code, other IDEs will also be sufficient. Before you start, please read this to get familiar with the process of contributing to Elektra.
Libelektra is hosted on GitHub. You can find its repository here:
To be able to make pull requests, you need a copy of this repository inside your GitHub account. You can find a tutorial about how to do this here (remember to sign in to your account first). After this, you should see this copy in the list of your own repositories with a hint of its origin.
To develop for libelektra, we now have to "download" your copy of its original repository. In Git this process is called "cloning". CLion has built-in Git support which we will use for this tutorial. Once you have opened CLion click on the button Get from VCS in the welcome-window.

Hint for WSL-Users: Cloning the repository into the WSL filesystem will speed up the compilation time!
i.e. clone into~/libelektraand not into/mnt/c/...
Now you should log in to your GitHub account from the IDE. Click on GitHub on the left and then on Log In via GitHub.... A browser window should open where you can enter your GitHub credentials. After successful authentication, the browser window closes and the GitHub information is available within CLion.
A list of repositories should be displayed. Select the entry libelektra to use your forked repository. At the bottom of the window, you can select a folder where you want to store your local copy and then click the button Clone.
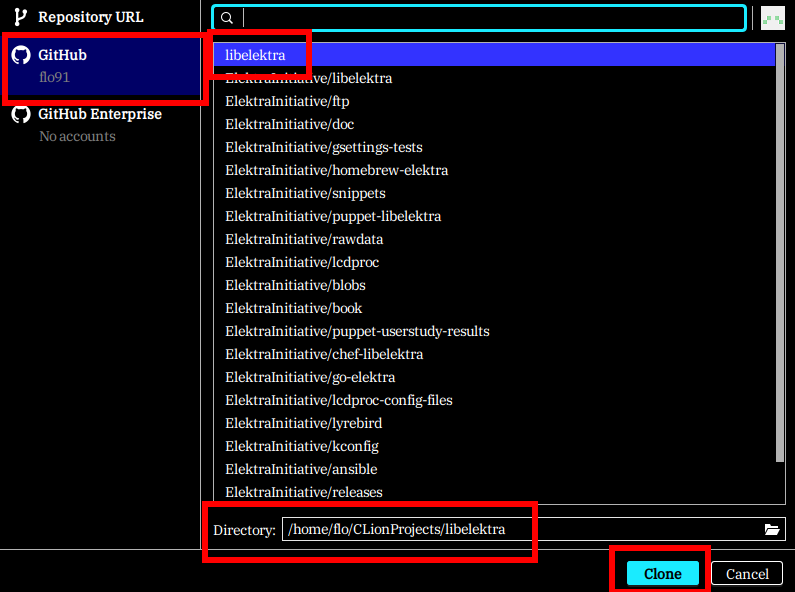
Alternatively you can also clone your repository using the command line. Open a terminal and navigate to the folder you want to save the source code into and type:
With the project now locally available we can start developing.
If you run in WSL, see WSL Setup
To import all the project configurations, right-click on the file CMakeList.txt in the root directory of the repository and select Load CMake Project, then click on Trust Project.
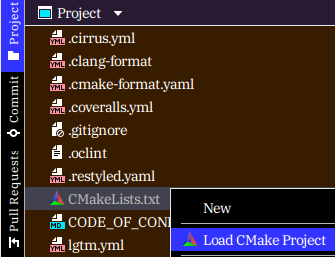
If the entry is not visible in the context menu, you can try to repair the IDE via File --> Repair IDE...
If you've cloned the project using a terminal, start CLion and once you see the main menu, click Open and select the CMakeLists.txt file inside the project's root directory. This will import the project accordingly and populate you run configuration with some predefined values. In rare occurrences this won't happen. If that is the case for you, simply restart CLion using:
File --> Invalidate Caches...
Now after all processes of CLion have finished, the project should be set up and the run configuration should be populated with entries.
Since some kdb-operations require root access and it is not recommended to start programs (like CLion) with root access if they usually don't require it, we have to change our CMake configurations to get rid of this requirement. To do that, open:
File --> Settings --> Build, Execution, Deployment --> CMake
There you can edit your CMake profiles. To get rid of the root requirement we'll add the following CMake options to our "Debug" profile:
where "[xyz]" can be replaced by any unique identifier so that different profiles won't clash with each other. This configuration also isolates your build of Elektra from any existing Elektra installation on your system. Note the missing ~/ from the argument to -DKDB_DB_USER, as libelektra internally already adds the home directory path. An additional ~/ would lead to a folder named ~ in your home directory. For debugging purposes we also recommend adding the following CMake options for debug builds to enable further logging and checks:
The following options can be added to build additional bindings, tools and plugins:
Another interesting option is to treat all warnings as errors:
The final configuration should look like this:
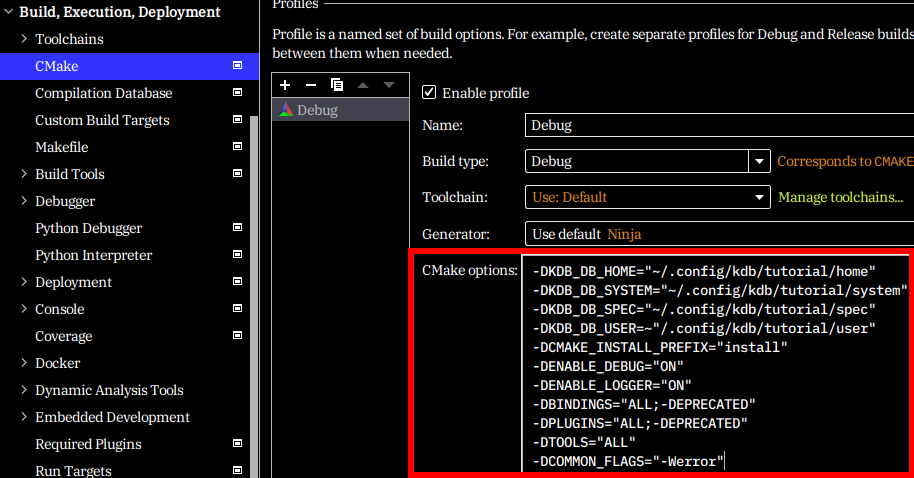
To increase the build speed you can also change the Build options to e.g.
which, in this case, starts 12 build jobs in parallel. For optimal performance this value should represent the number of available cores of your CPU + few extra jobs.
Take care to enter the parameter in the correct format, prefixed with "--" as shown here:

It remains to be noted that CLion maintains all CMake profiles in parallel. If some CMake file changes, CLion executes cmake for each profile which can put a lot of strain on your system.
Finally check if ClangFormat is enabled for the project to automatically adhere to the formatting guidelines of the project when formatting the code. You can find the settings here:
File --> Settings... --> Editor --> Code Style
Make sure the selected Scheme is Project.
At this point we assume you have cloned the repository into the WSL filesystem, as stated earlier.
Now we have to make sure CLion will use the WSL compiler executables or WSL toolchain.
Ctrl + Alt + S or go to File --> Settings... --> Build, Execution, Deployment --> Toolchains+ in the top left corner 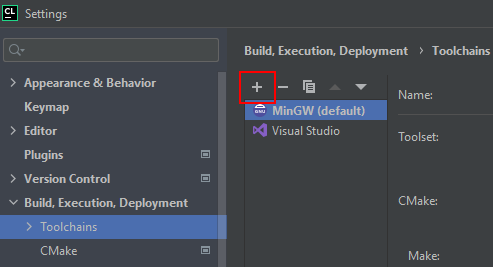
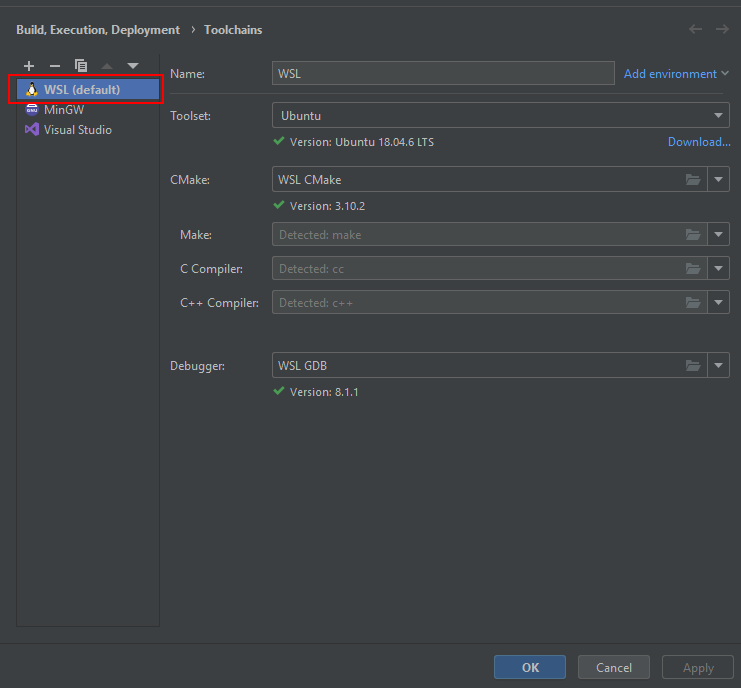
Alt + Up to set it as defaultOKThe WSL toolchain is now configured as the default. You can reload the CMake project by right-clicking on the root CMakeLists.txt and selecting Load CMake Project or Reload CMake Project
If you need further help with setting up CLion and WSL, visit the official Tutorial.
Usually the folders you have to work in to add functionality or documentation are as follows:
The most thorough way to test your changes is to run all tests. Therefore, navigate to your run-configurations (Run --> Edit Configurations...) and look for the entry CTest Application --> All CTest. The configuration should look like this:
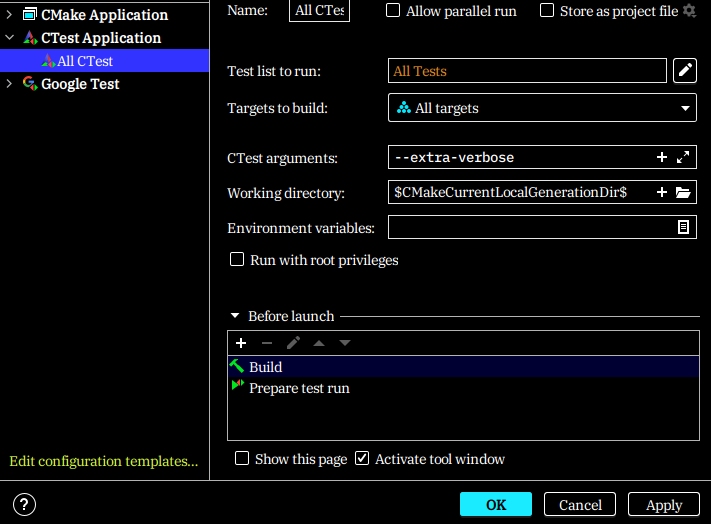
You can easily run the tests by clicking on the icon right to the selected configuration:

Now you can execute this run configuration, which will run all enabled tests. Alternatively you can also run all tests using the terminal by executing make run_all inside your build folder (e.g. /cmake-build-debug).
You can also run other specific tests by setting Executable to any of the testmod_* or testkdb_*targets. Additionally, all tests using Google Test (e.g. tests/kdb/*) can be run directly using CLion by opening their source code and clicking on the green icon next to the class name.
If you want to test various kdb methods separately, you can create your own run configurations. Add a new one by clicking on the "+"-sign on the top left of the "Edit Configurations..." dialog and name it. Here Target should be all and Executable should have "kdb" selected. If you for example want to test kdb plugin-info dump, write "plugin-info dump" next to Program arguments. That's it, now you can just test this part of kdb.
For further information please read this.
Another option to easily run all tests is via Docker. A tutorial about how to do this and with further information is available here. This is also recommended before creating a pull-request. You get feedback promptly and reduce load on the CI build servers.
Once you are satisfied with your changes, you have to commit them to your forked repository. By convention, such commits shouldn't be too large, otherwise it will become difficult to revert some small changes if they are not working as intended. If you use the terminal for your Git operations, to be able to commit code to your repository, you have to configure your local Git installation to use your GitHub credentials. You can find information about how to do this here. After you've set up your Git configuration, you can continue with uploading your changes.
By default, you are in the master branch of your repository. First, you should never directly work on the master branch, since only working code is expected to be there. This means, we now create a branch in our repository where our code changes will be published into. On the bottom right of your CLion window you can find the button Git: <branchname>. Click it and select + New Branch. Type in the name of your new branch (e.g. "testbranch") and keep Checkout branch checked to automatically switch to it as your working branch.
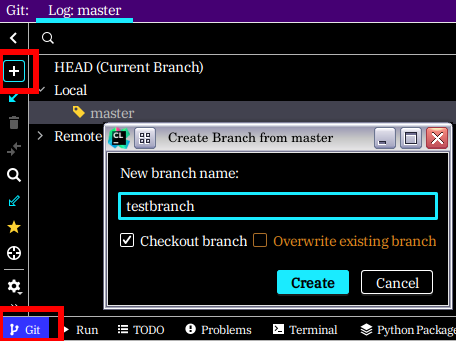
Alternatively open a terminal, navigate to the root directory of your local code and type:
After you have changed some files, it is time to publish them to your repository. To do that, select:
Git --> Commit...
In the dialog you have opened you can now select the files you want to include in your commit. When you double-click on a file, you can view the changes that are going to be committed. Make sure to write a meaningful commit message. The first line should have the following syntax:

If you fixed a bug in kdb cp the first line of your commit message could be KDB: Fixed cp not copying value. Your commit message should also include a reference to the issue you have fixed so that the issue can be closed automatically once your code change gets included to the official repository (e.g. Closes #1234). Before committing your changes please make sure that Reformat code and Rearrange code are disabled in the commit dialog. Otherwise, Clions formatter might produce files that don't adhere to our formatting guidelines.
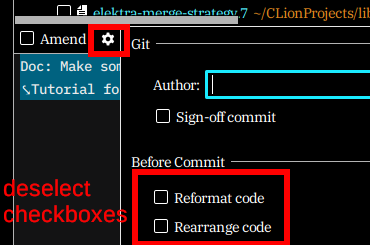
If you installed the pre-commit-check-formatting pre-commit-hook from the scripts directory ensure that Run Git hooks is enabled in the commit dialog.
Alternatively, you can run the formatting and fix-spelling scripts inside Docker. Further information about this option can be found here.
Finally you can commit your changes by clicking the Commit button and navigate to:
Git --> Push
To do that in one step, you can also click on the button Commit and Push... next to the Commit button.
Using the terminal you first have to add all files you've changed and also want in your commit to the stage. Suppose we've changed how kdb cp works, we now have to add it to our files we want to commit (you can add several files for a commit too):
Now we've staged our modified file for our commit. The final step is to actually commit it to your online repository. Therefore, type:
With this, you've published your changes to your remote branch of your repository. The next step is merging this change into the original repository.
This step is most easily done using a browser. Open the web page of the Git repository of libelektra (https://github.com/ElektraInitiative/libelektra) and log in to your account if you have not already done so.

Navigate to "Pull requests", there you can find a green button called "New pull request".


By clicking it (shortcut), you can now create a pull request referencing your forked repository and the branch,the modified code resides in. Click on "compare across forks" so that you can find and select your branch.

Choose "<username>/libelektra" as the head repository and "testbranch" as the compare-branch. Now the green button "Create pull requests" should be enabled.

By clicking it you can define the title of your pull request and write a description of the work you have done. Please read the template in this form and include the information stated there if possible. Finally, by clicking "Create pull request" you've successfully created a pull request to merge your changes into the official repository! Now maintainers of libelektra will review your code and, if everything is fine, merge your changes into the official repository. Otherwise, they'll comment on this pull request if further changes are needed. To include additional changes in this pull request, just commit new code changes to the same repository and branch you've referenced for this pull request, they will be added automatically to it. In any case check the output of the automated tests!
If you want to use CLion for creating Pull Request, please check out this link for further information.
In case you fail to run Elektra with the message like this one Reason: of module: libelektra-plugin-resolver.so, because: libelektra-plugin-resolver.so: cannot open shared object file: No such file or directory you can solve it by defining the LD_LIBRARY_PATH variable directly in CLion. Click on the debug configurations dropdown in the upper right corner and choose 'Edit Configurations...'. Then find 'Environmental Variables' field and add the following: LD_LIBRARY_PATH=PATH_TO_YOUR_LIB_DIRECTORY
Example:
LD_LIBRARY_PATH=/home/username/TU/libelektra/cmake-build-debug/lib
If you want to run built kdb outside of CLion, the recommended way is to run this script from your build directory. The script resides in you original directory with project sources.
Example:
Please keep in mind it sets the variables only in the currently opened shell window/session.
Please refer to this tutorial to fix the problem permanently.
KeySet, which can contain many Key objects, you can only see that there may be more than one key stored in this set by its size attribute since it's keys are referenced by a pointer. Just the first Key (referenced by the pointer) will be visible directly using the debugger. To analyse it's stored Key objects you can either add a watch or use the GDB debug console (next to the "variables" tab inside the debugger view).testmod_abc doesn't rebuild abc), please report the issue under https://issues.libelektra.org, so we can fix the CMake dependencies. As temporary fix you can try to rebuild the project and restart the test.