|
Elektra 0.11.0
|
|
Elektra 0.11.0
|
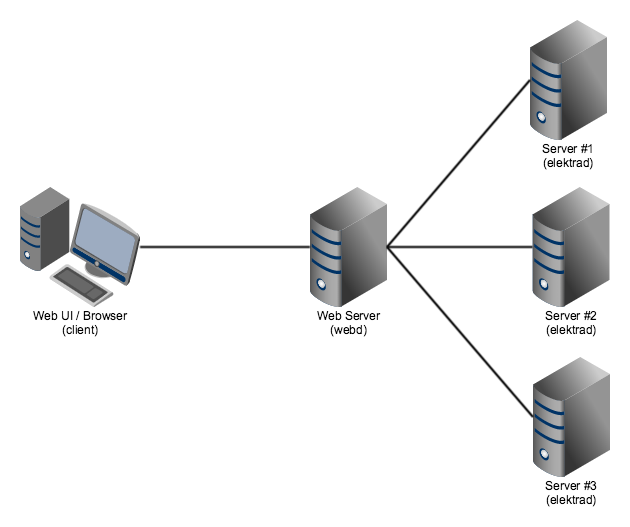
an API and web user interface to remotely manage Elektra instances
The configuration view of elektra-web is similar to the tree view of the qt-gui, but with dynamic fields rendered via key metadata.
Elektra-web requires:
yajl plugin installedTo build Elektra with the elektra-web tool:
yajl plugin (see links above)cmake .. -DTOOLS="kdb;web"makesudo make installdocker run -d -it -p 33333:33333 -p 33334:33334 elektra/webscripts/docker/webui/ (see Building Docker Image)cd libelektra/src/tools/webcd elektradgo build./elektrad (replaces kdb run-elektrad)cd webuinpm installnpm start (replaces kdb run-webd)If you do not want to configure multiple instances, you can set the INSTANCE environment variable to the server you want to configure. You can also set user:/sw/elektra/web/#0/current/instance to the host. Make sure to enter a full HTTP URL, e.g. http://localhost:33333.
If this configuration option is set, elektra-web will load the configuration page for that instance instead of the main overview page.
If you want to host elektra-web with the client and elektrad on the same instance, you must first start elektrad via kdb run-elektrad. Afterwards, you can run the client with:
It is also possible to set visibility by prefixing the host with VISIBILITY@.
For example (advanced visibility, user is default):
Now, when you open http://localhost:33334 in your browser, the configuration page for the instance will be opened immediately.
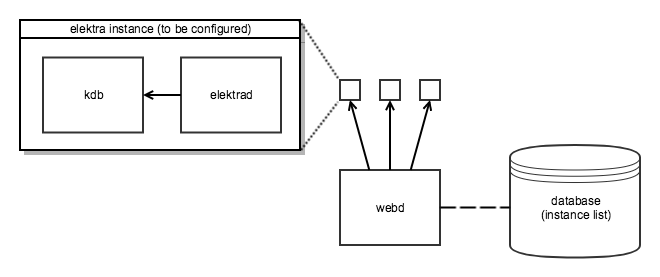
Elektra web consists of multiple components:
API blueprints are available for both APIs:
In order to test the API on localhost, you have to start an elektrad instance. This is possible in two ways:
Now the server is running on http://localhost:33333. After that you can test the API with help of Postman or similar tools that allow sending REST API requests.
Additional note: It is recommended to install the elektrad tool rather than starting the server manually. When Elektra is installed, the kdb command together with its tools is installed globally. For instance, whenever you would like to write a shell script which has to start a REST API server, you can just add kdb run-elektrad and execute it locally.
Examples:
First create a new key-value pair user:/test and set its value to 5. This can be done
The output of the commandline tool will be Set string to "5" if the key did not exist before. If the specified key didn't exist before, then the output will be Create a new key user:/test with string "5". Elektrad will respond with code 200.
The command
will now return the value of the specified key user:/test, which is stored in the database.
The command
will now create multiple metakeys at once. In this case, it will create two (metakey1 and metakey2).
The command
will now also return the two metakeys.
Currently, webd does not support authentication. The best way to work around this is to use a reverse proxy (e.g. nginx reverse proxy).
Once you set up a reverse proxy on your web server, you can use it to authenticate users, e.g. by username/password auth
elektrad/ - contains the daemon to interact with a single elektra instance
webd/ - contains a daemon to serve the client and interact with multiple elektra instances
webui/ - contains the elektra-web client (Web UI)
src/actions/ - Redux actions to access the KDB or display notifications in the UIsrc/components/ - React componentspages/ - pages in the appHome.jsx - the main page (overview of all instances)Configuration.jsx - configuration page (single instance)TreeItem/ - contains all UI components related to a single item in the tree viewdialogs/ - these dialogs are opened when certain actions are pressed (icons next to the tree items)AddDialog.jsx - dialog to create a new (sub-)keyDuplicateDialog.jsx - dialog to duplicate a keyEditDialog.jsx - dialog to edit a key valueRemoveDialog.jsx - dialog to confirm the removal of a keySettingsDialog.jsx - dialog to edit metadata (new metadata can be implemented here)*SubDialog.jsx - sub-dialogs of the SettingsDialogfields/ - special input fields to display various valuesApp.jsx - defines app structure and routessrc/index.js - main entry point of the app (fetches instances and renders UI)src/containers/ - contains components that are connected to Reduxsrc/css/ - contains CSS stylessrc/reducers/ - contains Redux reducers (used to process actions)Lockfiles (package-lock.json) can be updated by simply deleting the current lock file and running npm install, which creates a new lock file.
Check for outdated dependencies via npm outdated. Dependencies can then be updated by running npm update.
Run the following command in the scripts/docker/web/ directory, replacing 1.5.0 with the latest version:
Test the image:
Publish it to the docker registry:
NumberSubDialog.jsx file (or similar) to a new file in the webui/src/components/TreeItem/dialogs folder.SettingsDialog.jsx file in the same folder. For example, it could be added before the AdditionalMetakeysSubDialog at the end of the file:HANDLED_METADATA array in webui/src/components/TreeItem/dialogs/utils.js:webui/src/components/TreeItem/fields/validateType.js file to the validateType function.renderSpecialValue function in the webui/src/components/TreeItem/index.js file.